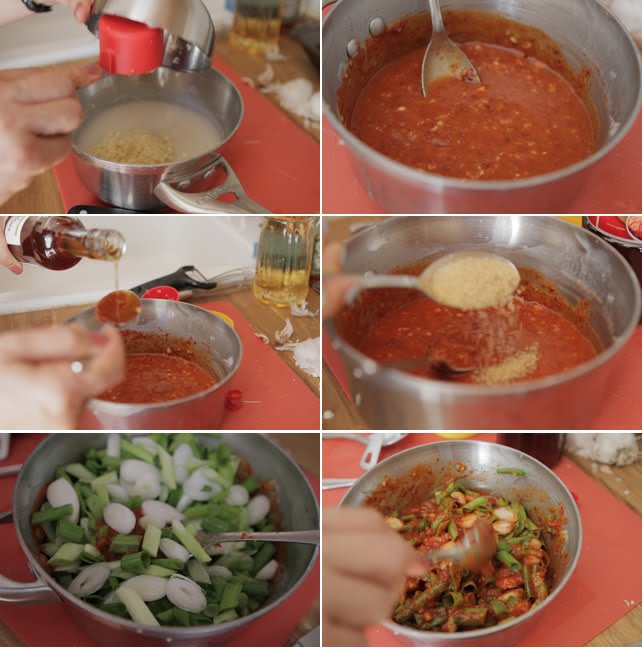
My mom is in town from Korea and this time she did not bring any home made kimchi with her. She could tell I was a little disappointed but quickly made up for it by offering a crash course in quick and easy kimchi making. For Jeana and I it was not quick or easy, but definitely useful as we now have a grasp on what is actually involved in making kimchi.
Making kimchi can be divided into three parts: salting the vegetables, making the seasoning sauce, and seasoning the vegetables.
Part I. Salting the cabbage
Ingredients:
2 heads of chinese cabbage
Lots of coarse salt, around 20 handfuls to be safe
2 cups water

1. Remove rough outer leaves of cabbage. Halve and core them. Then cut into 2 inch pieces.
 2. Wash the cabbage thoroughly in cold water and drain.
 3. In a small bowl add a handful of salt to about 2 cups of water and dissolve. Pour a third of this salt water mixture into a large bowl. (A really large bowl or even a stock pot if you don't have a big enough bowl.) Put a layer of cabbage in the bottom of bowl. Sprinkle a generous handful of salt. Add another layer of cabbage. Sprinkle another generous handful of salt. Continue like this until all the cabbage is used. Then pour the rest of the salt water mix on top.
 4. Let the cabbage sit for 1-2 hours, depending on how salty you like the kimchi. Use your hands to flip over the cabbage halfway through. Taste a piece and if the cabbage itself is salty then it's ready.
 5. Rinse in cold water. Don't shake it out but let it sit in a colander for about 20 minutes to drain naturally.
 Part II. Making the seasoning
Ingredients:
1 1/3 cups water
1 1/3 T flour
1/2 cup minced garlic
1/3 T ground ginger
4 T Korean fish sauce (please don't use Vietnamese fish sauce! buy it here)
5 T red chili powder
2 T plum extract (substitute with honey if you really really can't get it, but my mom swears by this product. She will add it to everything.)
1 T sugar
1 packet stevia
2 bunches of green onions, sliced
1. Put the water and flour into a pan and let simmer over very low heat while stirring with beater. Continue until the mixture turns into a kind of runny gluey consistency. Remove from heat. This is the base for seasoning.
2. Add the remaining ingredients and mix well.
Part III. Mixing the cabbage
 1. Add the drained cabbage and seasoning into a large pot.
2. Use your hands to mix it all up. (My mom was upset that I didn't have those clear disposable kitchen gloves as she is the type of person to wear gloves while driving or hiking.)
 3. Put it into a plastic container. Cover the kimchi with a piece of plastic wrap so it is not exposed to air. Put the lid on and let it sit at room temperature (not in direct sunlight) for a day and a half. Taste it every now and then. If it tastes like it's starting to ferment, then it is ready to go into the fridge. Don't put it in before otherwise you will just end up with lifeless kimchi. (But if you wait too long to put it in it will be too sour and tangy, so be careful.)
We put the kimchi in the fridge after a day and a half and followed the recipe above exactly and it turned out delicious. Not too spicy(because of my American husband's poor belly) but tangy and flavorful. I think this is the recipe I would use again as it's my mom's and I am used to this, but if you like to have your kimchi more spicy or salty adjust the amount of red chili powder or the amount of salt you use in the salting process. There are many variables such as the time of year or the freshness of cabbage and quality of the seasonings. This is a really good recipe to tweak but it may take a couple attempts before you find the perfect one for you.
My mom now has one less thing to worry about. Enjoy!


